QZ qz thoughts
a blog from Eli the Bearded
Tag search results for do-it-yourself Page 1 of 10

Sticker Roller Box


Shelf full of sticker rolls

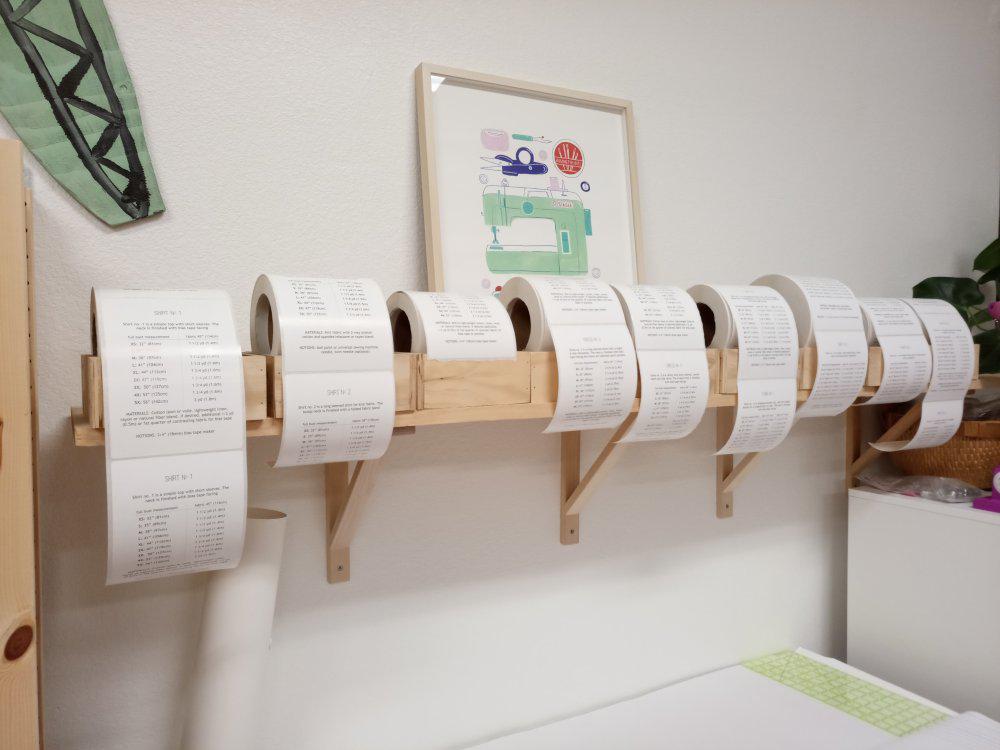
Each of these rolls has a label for a different product.

My wife sells sewing patterns. Patterns directly sold to customers through the website have the package just taped shut (with color coded tape). Patterns sold in stores need information on the back about sizes and how what materials are needed. Originally she just used to print stickers in a laser printer, but as sales grew that became expensive and awkward. So she had stickers printed by a service. For price-per-sticker reasons, she gets a thousand at a time for each pattern. These come in heavy rolls. Sometimes it will be a single large roll of 1000, sometimes two medium rolls of 500 each.

Rolls want to be rolled. But if you just put them up on a closet hanger pole, they don't roll well. The bar isn't near the center, there's friction, and it ends up being a mess.

So instead support these giant rolls with two smaller bars. And make a "roller bearing" to help them spin. I made a set of boxes to do just that.

One view of an empty roller box

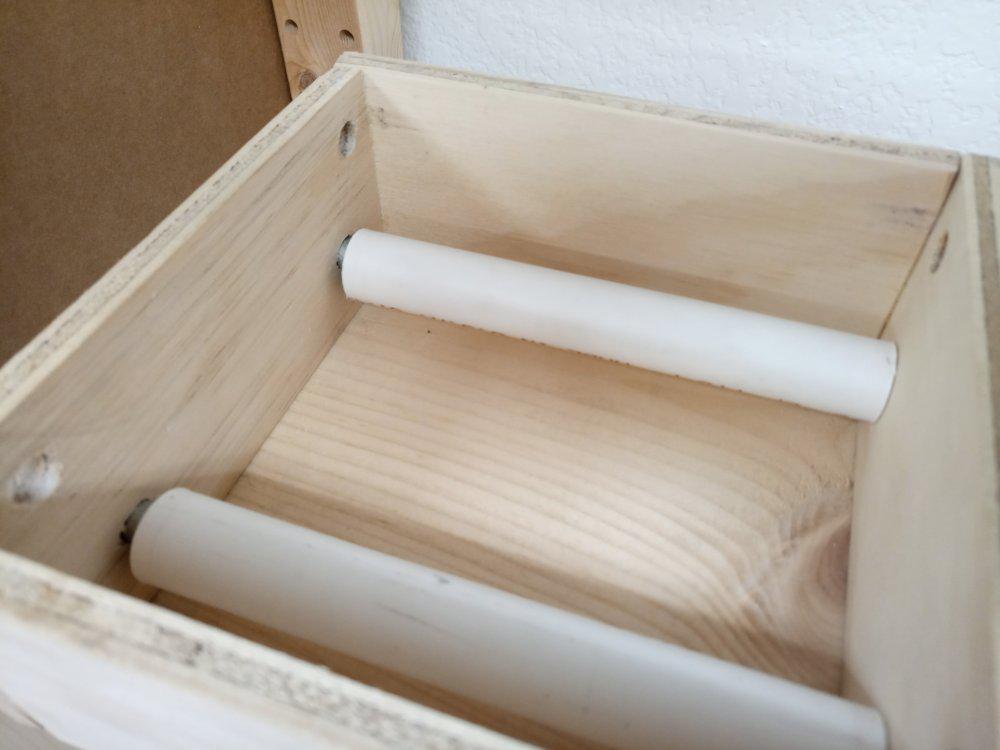
The box doesn't have a bottom, that's just the wooden shelf it is setting on. I orginally planned it around using the rollers in the upper position only. For a full large sticker roll that is necessary. The medium sticker roll is more forgiving of variations. Both will fall through the wide one eventually, and need the narrow.

Another view of an empty roller box

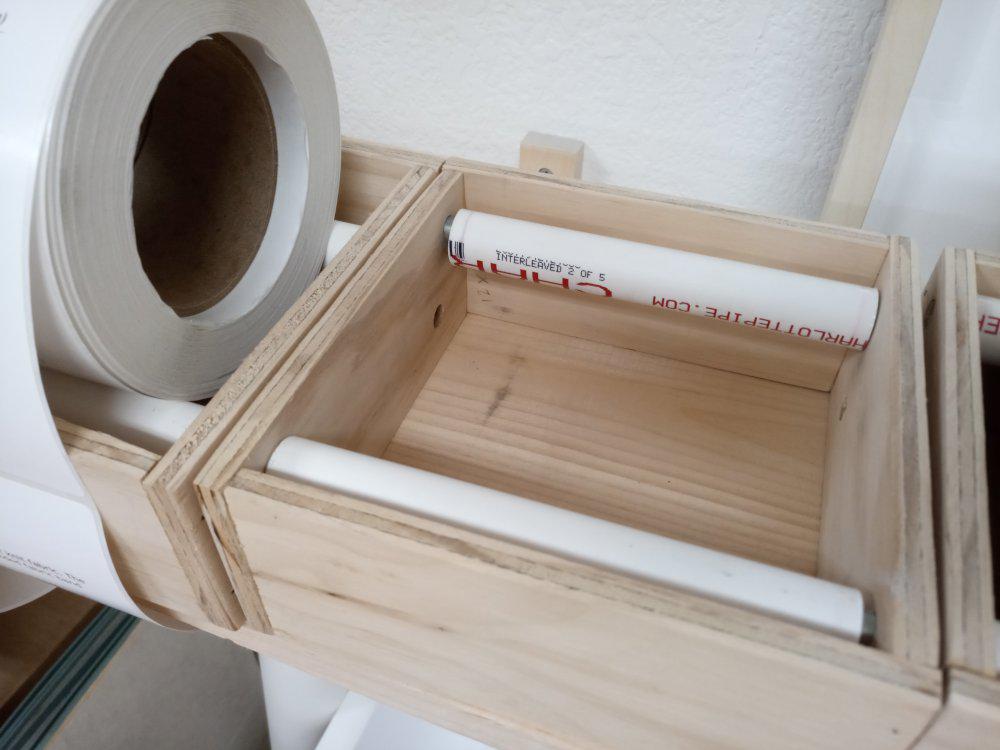
The box partially visible on the left has the narrow roller on top configuration for a small (500 sticker) roll. The empty box has the configuration for a large (1000 sticker) roll.

Each box is made from four identically sized pieces of wood, with sides each having four holes corresponding to two high rollers and two low rollers. One pair of rollers is wide, for big rolls, one pair is narrow for smaller. The box can be flipped to make wide or narrow the higher pair.

The rollers are 3/8" (9.4mm) steel bars with 1/2" (12.7mm) inner diameter PVC water pipe for a roller bearing. There are only two rollers at a time in a box, the steel bars are just friction fit and can be swapped.

This works great. If I were doing it all again, I'd not use the all four identically sized pieces of wood design.

Simplied sketch of construction

The holes have to be offset differently on left and right sides with this layout which ended up making the drilling of the holes and the assembly a lot more complicated than it needed to be. Setting up the table saw for cutting longer and shorter pieces of wood would have been much easier overall.

My Alarm Clock


When I was a kid, maybe twelve, I got a German made wind-up alarm clock, the type with the two bells on top and separate springs for the clock and the alarm. That was my "daily driver" of an alarm for a long time. After I married, my wife hated it because the ticking was "loud" when she was trying to get to sleep. When one of the springs finally broke, probably about 2005ish, I switched to using my cellphone as an alarm. Some Nokia brick. Eventually I switched to a Audiovox flip "feature" phone.

The Audiovox was Nokia quality indestructable. (But it was in many ways a terrible phone.) I used it as a phone for years and then when I finally upgraded, I continued to use the Audiovox as an alarm clock for some more years. I replaced it only in 2016.

On the Audiovox the alarm mode had three alarms that could be set, and then enabled or disabled. I found that three different wake-up times covered 90+% of my usage: wake up on a day when the kids have school, wake up on a day when I have work but the kids don't have school, and weekend. Then there would be 5 to 10% of the time when I'd need a special time for something.

So when it came to replacing it, I wanted an alarm clock that would give me three different standard times and one special, and I wanted an interface that could let me set a week of them at once. I turned to a "pocketCHIP" (hereafter Pocketchip) tiny portable computer.

Screenshot of the program

Pink buttons show alarms on, white ones show alarms off. The day of week button turns off all alarms for that day. Time of day is shown on the current day of week. Code available from my github page, it's Perl with Tk for the X11 UI.

The Chip was a $9 computer, the "Pocket" part was an attachment to add a keyboard, touchscreen, battery pack, headers for GPIO etc, and a small hacking space. Overall it cost about $60, which was (and is) a steal compared to what a Raspberry Pi outfited as a laptop / tablet / netbook / other portable computer costs. As of 2020, you can still find new-old-stock on ebay for $50ish. Unlike a Pi, Chip was low-res: no HDMI option; and has built-in wifi and bluetooth and built-in storage. Now Pocketchip isn't great, it's got a take-you-back-to-the-late-1980s pixel count (480x272), a painfully awkward keyboard, no built-in speakers, and poor audio volume from the audio jack.

I modified mine adding a basic mono amplifier (PAM8230 from Adafruit) and a speaker attached to that. I also connected one of the GPIO pins to a standard 1/8th inch (2.5mm) audio jack, to use with an external button. There was ample room in the case for the amp, speaker, and extra jack. I did need to cut the plastic a bit to get get the proper parts sticking out.

Back of the modified Pocketchip

The green board in the upper left is for the GPIO 2.5mm jack, the blue board near it is the add-on amp, there's an on-off switch for the amp in the far upper left, and the speaker is squeezed in on the bottom right. The larger black board is the Chip $9 computer, and the silver thing below it is the rechargable battery.

Then I built a button out of a wooden box and Cherry D42 switch with a lever that I pulled out of some device. The lever holds the top of the box slightly open, pushing the lid down closes the switch. Big easy to push button for sleepy alarm silencing.

When the alarm fires, a program plays a sound file (repeatedly up to 30 times or 60 seconds as configured) and listens to a GPIO pin. Every 1/100th second the GPIO pin is sampled. With ten high samples and ten low samples — to allow for a switch normally open or normally closed — it decides that's enough and kills the sound playback and quits.

A look inside the button

This part was made entirely with reused stuff I had laying around.

I wrote the alarm software sometime in 2016 and have made only slight modifications to it since then. It works, and it works well. When I built myself a new bedside table last year, I designed it to have a place for the Pocket chip to hang, and suitable space for all the wires.

View of the installed alarm

I made the lamp first, then the alarm button to fit under the lamp, then the table that this all lives on. The drawer holds pencils and bookmarks, the current night time reading is on the table, the next books to read on the first shelf, books done reading go on the shelf below that. All of this is from scavenged or left-over material.

As this setup gets long in the tooth, I'm starting to think about what I do next. In particular, I worry about the Chip failing and/or the battery becoming useless. I've been thinking it might make a good learn Arduino project. I'd prefer to spend less than $100 on all parts, have a system with at least the current capabilties, including normally plugged in but with at least an hour's backup power to ride out blackouts. And a screen that I can easily turn off for darkness. It's been fun browsing, but I don't have a parts list yet.

Micro Press


I saw someone else's teeny press project and was inspired. The design is interesting. Brian Cook's is a simple fold down frame and matching rubber stamps. Pluses: easy to get good registration, simple design and construction. But I can see room for improvement. Minuses: fixed size/shape block, fixed size shape paper, hand-pressed rubber stamps are hard to evenly press.

Modeled after a torilla press, I can get a lot of evenly distributed pressure. I made this using only materials I had laying around. There is a scrap of plywood for the base, and smaller scraps to hold the platen. Pine 2x2 for the press part, with 1/4" bolts screwed up from the underside. The main hinge on the lever is a bit of steel rod, the smaller plunger hinge is made from a large nail.

The platen ("flat plate of a printing press that presses the paper against the type") is some thick plastic I cut into 5" squares. The plastic came from an old combination scanner/printer. It seems to be optical polycarbonate with a fine grid printed on it. Very strong, very clear, very hard, very flat. Somewhat tricky to work with. Tools can melt it and then have the molten plastic move to a cooler spot and where the plastic suddenly hardens again. It seized up a drillbit for me, for example.

Very flat and hard makes a great platen.

I have two bolts there for alignment, not support. The stack here is

  1. plywood base
  2. plastic layer (bolts screwed into melted in nuts)
  3. block and frame for holding print block, loose fit over bolts
  4. paper, alignment to be done with masking tape on plastic
  5. second plastic layer, loose fit over bolts

I have a lot of small chisels for lino work. None are great, but I'm not a great artist either. I decided on a simple rendition of the press itself for the first print (above). There's something satisfying in linoleum carving I find. Like Brian Cook's press, this is a two inch square. Unlike his, my press can accomodate other (small) sizes and shapes.

Pretty successful. The letters didn't come out as clearly as I'd like. My smallest chisels don't seem sharp or fine enough to do lines that small.

Here's an example of moving away from the two inch square, here with 45mm circular blocks.

I have two multipacks of these plastic linoleum substitute printing discs, purchased on a whim some years ago. The idea behind them is to make stamps with a special handle. I don't have the handle. These are not satisfying to carve. The print surface is smooth and firm, then it gets softer in the middle, with a rough backside coated with adhesive. The material is harder to cut than real lino. The adhesive to attach (it to the handle) is strong enough to be annoying but not strong enough to be effective.

I carved a border first (the green) then a second disc with an image. I didn't print the border onto the second, but did attempt to measure how much space I needed. It seems like I should use a more accurate system.

Overall, I'd say the press is pretty effective, and meets the goals I had in mind when I started. After using it I find that it is very easy to get a nice even pressing of the block into the paper, paper alignment (registration) works pretty well, and making new frames is pretty easy. It does have the drawback that it's somewhat slow and cumbersome to ink-up and swap paper. I hadn't given that enough thought during the design. Still, it works and cost me nothing.

Tiring, err, Tiling work


Before Covid-19 reared it's head, my wife took out a lease on what we're calling the shop-factory. For the past decade she has made money selling patterns and teaching people knitting and sewing. The space is a former cleaners. With some cleaning, and a few repairs, it was mostly suitable. Except the bathroom. That needed a lot of work.

Most of the business has been sewing patterns in the last three years. Giant pieces of osper that need to be folded to fit in a 6"x8" and booklets with instructions to be printed, folded, and stapled. Then put in a folder and taped shut for ssle.

The idea is the shop-factory would be a place to manage her business from — instead of using a room of our house — and also be a place she could teach classes. A big table for folding patterns. A row of small tables for sewing machines for students. Shelves to hold all the business consumables. A bathroom students to use, with space to change. A large mirror for seeing how garments, once made, look.

Covid-19 has put a damper on treaching classes, for sure. And shelter-in-place has interrupted preparing the space. We took the sink and vinyl floor out of the bathroom in March and then it was nothing happening for so long. Finally, Memorial Day weekend we made progress. Started with taking the toilet out. Then putting down a moisture barrier. Then tiling. Then grouting. Finally cleaning up.

Tiring work.

toilet removed
tiling begun
grouting finished
nippers and waste