udev for the win
So I have an Arduino Uno now and some parts to begin working on my
alarm clock project
but I'm still new to Arduino and need to get comfortable with programming it.
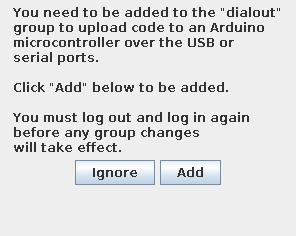
So first thing I do is fire up the standard Arduino GUI programming tool ("IDE"
in the argot of those that like such tools).
And I'm ready to Ackchyually it.
Being added to the dialout group is a pretty good fix. But it's not
the only way to do that, so "need" is a strong word. The advantage
of being in the dialout group is it works pretty generally and
without any extra tooling. The disadvantage is group membership is
inherited from login, and I don't want to log out and log in again.
A logout is as good as a reboot, and usually it is the reboot that
forces the logout. These days I try to limit it those to once a month
or less, depending on important kernel updates. It's been less than
two weeks now, way too soon for that much disruption.
So here follows an alternative route with udev rules.
First I need to identify the device to apply those rules. I'll start
with watching what's going on in /var/log/syslog when I plug the
device in:
Nov  7 19:49:59 slate-asus kernel: [947954.307562] usb 1-3: new full-speed USB device number 8 using xhci_hcd
Nov  7 19:49:59 slate-asus kernel: [947954.458285] usb 1-3: New USB device found, idVendor=2341, idProduct=0043
Nov  7 19:49:59 slate-asus kernel: [947954.458291] usb 1-3: New USB device strings: Mfr=1, Product=2, SerialNumber=220
Nov  7 19:49:59 slate-asus kernel: [947954.458294] usb 1-3: Manufacturer: Arduino (www.arduino.cc)
Nov  7 19:49:59 slate-asus kernel: [947954.458296] usb 1-3: SerialNumber: 8593731353731234A012
Nov  7 19:49:59 slate-asus mtp-probe: checking bus 1, device 8: "/sys/devices/pci0000:00/0000:00:15.0/usb1/1-3"
Nov  7 19:49:59 slate-asus mtp-probe: bus: 1, device: 8 was not an MTP device
Nov  7 19:49:59 slate-asus kernel: [947954.532024] cdc_acm 1-3:1.0: ttyACM0: USB ACM device
That's all I really need there, but there's other ways to get that
information. If you are not used to reading that log, here's the
general format of what it is showing:
-
Nov 7 19:49:59 date and time in system default timezone (US Pacific
for me).
-
slate-asus computer name. I uniquely name all my computers, and this
one doesn't have an obvious model name on it, so color - maker.
-
kernel: / mtp-probe: the name of the component creating the
message. Messages from the kernel include the uptime in seconds, eg
[947954.532024], which is one week, three days, twenty-three hours,
nineteen minutes and a bit over fourteen seconds. Way too soon to
reboot.
-
checking bus 1, device 8: "/sys/devices/pci0000:00/0000:00:15.0/usb1/1-3
This message from the media transport protocol probe has one way to
identify the device.
-
cdc_acm 1-3:1.0: ttyACM0: USB ACM device This contains the other
way. cdc: communications device class; acm: abstract
control model. Essentially this is a modem-like serial device on USB
(the "universial serial bus"). And modem-like is why the group is
dialout.
Another way to find the device name is look in the /dev/
directory and find the new file that was created when plugging the
device in (here, /dev/ttyACM0) and have the udev system tell us
what it is with the udevadm info -a -n /dev/ttyACM0 command
(verbose output partially removed):
# udevadm info -a -n /dev/ttyACM0
Udevadm info starts with the device specified by the devpath and then
walks up the chain of parent devices. It prints for every device
found, all possible attributes in the udev rules key format.
A rule to match, can be composed by the attributes of the device
and the attributes from one single parent device.

  looking at device '/devices/pci0000:00/0000:00:15.0/usb1/1-3/1-3:1.0/tty/ttyACM0':
    KERNEL=="ttyACM0"
    SUBSYSTEM=="tty"
    DRIVER==""

  looking at parent device '/devices/pci0000:00/0000:00:15.0/usb1/1-3/1-3:1.0':
[...]
  looking at parent device '/devices/pci0000:00/0000:00:15.0/usb1/1-3':
[...]
  looking at parent device '/devices/pci0000:00/0000:00:15.0/usb1':
[...]
  looking at parent device '/devices/pci0000:00/0000:00:15.0':
    KERNELS=="0000:00:15.0"
    SUBSYSTEMS=="pci"
    DRIVERS=="xhci_hcd"
    ATTRS{broken_parity_status}=="0"
    ATTRS{class}=="0x0c0330"
    ATTRS{consistent_dma_mask_bits}=="64"
    ATTRS{d3cold_allowed}=="1"
    ATTRS{dbc}=="disabled"
    ATTRS{device}=="0x5aa8"
    ATTRS{dma_mask_bits}=="64"
    ATTRS{driver_override}=="(null)"
    ATTRS{enable}=="1"
    ATTRS{irq}=="123"
    ATTRS{local_cpulist}=="0-1"
    ATTRS{local_cpus}=="3"
    ATTRS{msi_bus}=="1"
    ATTRS{numa_node}=="-1"
    ATTRS{revision}=="0x0b"
    ATTRS{subsystem_device}=="0x201f"
    ATTRS{subsystem_vendor}=="0x1043"
    ATTRS{vendor}=="0x8086"

  looking at parent device '/devices/pci0000:00':
[...]
We'd get the same relevant information from the other identifier using
the udevadm info -a /sys/devices/pci0000:00/0000:00:15.0 command.
Every single thing in that list of device info can be used as a key
for trigging a udev script. The ATTRS{subsystem_device} or
ATTRS{subsystem_vendor} is a good choice for being relatively specific
to plugging in an Uno and getting a device.
So now we know what to use as a trigger, let's use that to run a
script. In /etc/udev/rules.d/ live *.rules files for what to do
for devices. On my system the highest numbered existing rule is
70-snap.snapd.rules, so I'll pick a two digit number higher than
that and create my new rules file.
$ cat /etc/udev/rules.d/80-arduino.rules
ATTRS{subsystem_device}=="0x201f", ACTION=="add", RUN+="/usr/local/bin/plugin uno"
$
Each line is a rule. This one says when the subsystem_device
attribute is 0x201f and the action happening is an add, then add
to the list of things to be run /usr/local/bin/plugin uno. The
argument isn't really needed for udev, because there are enough
environment variables to use for context, but could be handy for hand
running it. I (or you) could match on more than one attribute by just
adding them to the list:
ATTRS{subsystem_vendor}=="0x1043", ATTRS{subsystem_device}=="0x201f", ...
With the rule in place, we need to reload the udev configuration in
order to have the rule take effect. This is much easier than a reboot.
# udevadm control --reload
#
A note on prompts: in my copies of terminal output, a prompt of $
means that it is a command to be run as a regular user, and a prompt
of # means it requires superuser privileges. I usually use a
superuser shell, but sudo in front of the command is the common
way these days.
Now we have a rule to run something when the device is plugged in, we
should figure out what to run. A stub script is very helpful here:
$ cat /usr/local/bin/plugin
#!/bin/sh

log=/var/log/plugin-udev.log
exec >> "$log" 2>&1     # "exec" changes stdout, etc, while running

env
$
Plug the Uno in, and then look at the plugin-udev.log file.
$ cat /var/log/plugin-udev.log
ID_BUS=usb
DEVNAME=/dev/ttyACM0
ACTION=add
ID_VENDOR_FROM_DATABASE=Arduino SA
ID_PCI_INTERFACE_FROM_DATABASE=XHCI
ID_SERIAL_SHORT=8593731353731234A012
ID_USB_DRIVER=cdc_acm
ID_USB_CLASS_FROM_DATABASE=Communications
DEVPATH=/devices/pci0000:00/0000:00:15.0/usb1/1-2/1-2.1/1-2.1:1.0/tty/ttyACM0
ID_MODEL_ENC=0043
ID_USB_INTERFACES=:020201:0a0000:
ID_MODEL=0043
SUBSYSTEM=tty
ID_MODEL_ID=0043
MINOR=0
ID_MODEL_FROM_DATABASE=Uno R3 (CDC ACM)
ID_PATH=pci-0000:00:15.0-usb-0:2.1:1.0
ID_MM_CANDIDATE=1
ID_VENDOR_ENC=Arduino\x20\x28www.arduino.cc\x29
[...]
There's a lot in there, so I could use ID_MODEL_FROM_DATABASE or
ID_MODEL_FROM_DATABASE instead of uno as an argument, but I'm
going to stick with that method to flag what to do. But I will have
DEVNAME tell me what to act on. Next version of the plugin script:
#!/bin/sh

what="$1"

# device to try for "uno" if $DEVNAME is not set
uno_dev=/dev/ttyACM0

log=/var/log/plugin-udev.log
if [ ! -w "$log" ] ; then
  echo "$0: Intended to be run as root from udev scripts."
  exit
fi

exec 3>&1               # create 3 as copy of stdout
exec >> "$log" 2>&1     # make orig stdout/stderr logfile

now=$(date +%Y/%m/%dT%H:%M:%S)

case "$1" in
  uno) device=${DEVNAME:-$uno_dev}
       if [ -c "$device" ] ; then
         echo "$now - chowning $device now"
         chown username "$device"
       else
         echo "$now - can't find $device"
       fi
       ;;
  ?*) echo "$now - unrecognized plugin event: $1"
      echo        "unrecognized plugin event: $1" >&3
       ;;
  *)  echo "$now - need a udev event, eg 'uno'"
      echo        "need a udev event, eg 'uno'" >&3
       ;;
esac
I juggle stdout/stderr a bit here. First I open file descriptor 3 as a
copy of stdout, then I change stdout and stderr to go to the logfile.
This means anything normally sent to stdout or stderr will go in the
log, and I can capture output and errors there, but because if I want
to print to the original stdout (probably a terminal), I need to do it
explicitly through file descriptor 3. Any program I run, will use the
logfile for output but I can also print to the terminal. I use that
for the unexpected usage cases. If someone with privileges runs
/usr/local/bin/plugin that gets logged in the logfile and gets a
message on the terminal. (Someone without privileges probably gets
stopped when I check if the logfile is writable with [ -w "$log" ].)
So, let's try it out. Plug in the USB cable from the Arduino and:
$ ls -l /dev/ttyA*
crw-rw---- 1 username dialout 166, 0 Nov  8 13:39 /dev/ttyACM0
$ groups
username adm cdrom sudo dip plugdev lpadmin sambashare docker rvm
$ tail -1 /var/log/plugin-udev.log
2020/11/07T21:51:46 - chowning /dev/ttyACM0 now
$
Presto, the device "belongs" to me, I can write to it without being in
group dialout.
People often use udev rules for dealing with permissions related to
thumbdrives, and there are a bunch of tutorials on doing that sort of
thing, but udev is more useful and I wanted to show that.
 qz thoughts